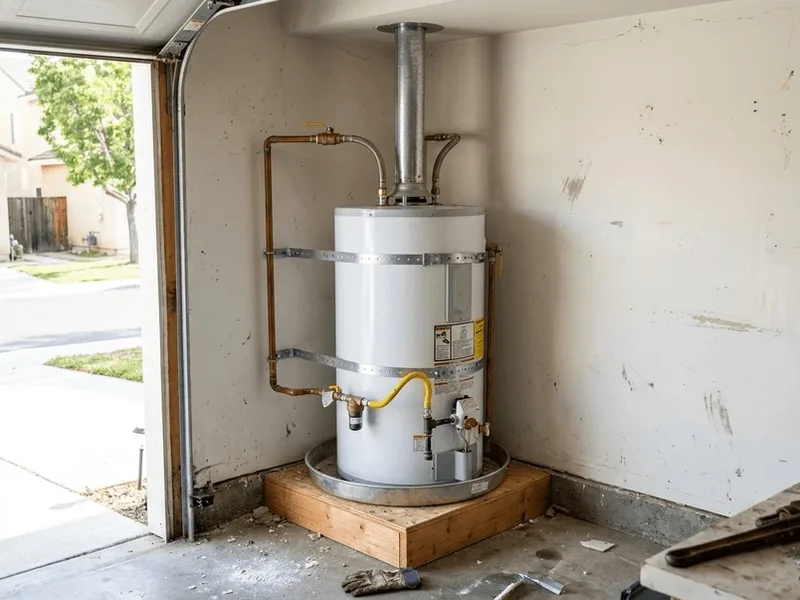
Tank Water Heater Leak Repair in Red Oak, TX 75154
IN SHORT: Not every water heater leak means a new water heater — valves and fittings are repairable, often the same day. We diagnose the exact leak source in Red Oak homes and fix what's actually broken. Call (833) 713-2101 for tank water heater leak repair in Red Oak, TX 75154.
Same-day service in Red Oak. Book Service →
Repairable vs. Fatal: Reading Your Leak
Your water heater doesn't have to explode to ruin your week — a slow, steady leak does the job quietly. It seeps into drywall, wicks into baseboards, feeds mold in the wall cavity, and shows up on your water bill long before you notice the puddle. In North Texas, the usual story is a tank past its prime: sediment has buried the bottom, the anode rod gave up years ago, and corrosion found the weak spot. Whether the answer is a targeted repair or a full replacement depends entirely on where the water is escaping — and we find that out before quoting anything.
A tank water heater can leak from two fundamentally different places, and the distinction decides everything. Repairable leaks come from components attached to the tank: the temperature-and-pressure (T&P) relief valve dripping from its discharge pipe, the drain valve weeping at the tank bottom, inlet/outlet nipples or dielectric unions seeping at the top, supply flex lines failing at their connections, or simple condensation mistaken for a leak on a humid Texas morning. These are fixed by replacing the failed part — the tank itself soldiers on.
Fatal leaks come from the tank body: rust weeping from the side seam, water pooling under the tank with no fitting above it to blame, or pinholes in the steel shell. A tank is a glass-lined steel pressure vessel, and once corrosion breaches the steel, there is no patch, no sealant, no repair — only replacement. The glass lining protects the steel until sediment, depleted anodes, and hard water defeat it, typically in the 8-to-15-year range in North Texas.
The Local Plumbing Reality Behind the Leak
Red Oak rides the I-35E growth corridor between DeSoto and Waxahachie: 1990s subdivisions maturing into their second water heater generation, plus 2000s and 2010s rooftops still on their first. The 1990s-era homes are the current hotspot — original or early-replacement heaters now 15 to 25 years old, failing at valves, elements, and tank seams.
Commuter suburb with new schools and steady growth — close enough to DeSoto that service is fast, established enough that the 1990s housing stock is generating constant water heater work.
For leak work, Red Oak's housing stock is the risk map: tank age, anode history, code-item gaps (expansion tanks, drain pans, T&P routing), and install location. The diagnostic visit covers all of it, because where the water is escaping is only half the story — why it started escaping decides whether repair or replacement is the honest answer.
Step by Step: From Puddle to Fixed
Here's exactly what happens when we handle tank water heater leak repair in Red Oak — no surprises, no guesswork:
Step 1 — Locate the source before touching anything. We don't quote repairs until we know what's leaking. The area gets dried, paper towels go down around every suspect point, and we watch. T&P discharge, drain valve, top fittings, supply lines, tank shell — each leaves its own evidence. This fifteen minutes of patience prevents the classic mistake: replacing a water heater for a leak that was actually a $30 valve.
Step 2 — Stop the water and make it safe. Cold-water inlet valve closed (or the house main if the inlet valve is frozen), power off at the breaker for electric units, gas control to 'off' or 'pilot' for gas units. If the leak is active and the inlet valve won't budge, we go straight to the main. Safety first, always — a leaking tank under pressure is unpredictable.
Step 3 — Controlled drain-down. A hose goes on the drain valve and the tank drains to below the repair point — partially for a top fitting or T&P valve, fully for a drain valve or tank replacement. We open a hot-water faucet to break vacuum and monitor the drain; sediment-clogged drain valves are common in unflushed North Texas tanks and get worked patiently.
Step 4 — Repairing the failed component. T&P valve: replaced with a correctly rated new valve, discharge pipe verified to code routing. Drain valve: swapped for a full-port brass ball valve. Top nipples and dielectric unions: cut out the corroded section and rebuilt with proper dielectric separation. Supply flex lines: replaced, never reused. Each repair is pressure-tested before we call it done.
Step 5 — When the tank has failed: replacement. If the shell is breached, there's no repair — only replacement. The old tank comes out, the new one goes in with current code items: expansion tank on closed systems, drain pan with proper drainage (mandatory for attic and interior installs), correct T&P discharge routing, and earthquake strapping isn't a Texas requirement but secure placement is. We size to the household's actual hot-water demand, not just what was there before.
Step 6 — Refill, purge, test, and protect. Tank refilled completely, air purged from every hot tap, then power or gas restored — never energized dry. We verify no weeping at any connection, confirm the burner or elements cycle correctly, check the T&P and expansion tank pressures, and recommend a leak detector with an alarm for the pan. You get hot water back the same visit, with the failure's root cause explained in plain language.
How Red Oak's Homes Spring Tank Leaks
Municipal water of moderate hardness. Standard North Texas sediment story: a decade or more of mineral accumulation in tanks that were never flushed, insulating lower elements and burying gas valve probes. Sediment is the accelerant and the depleted anode is the permission slip: mineral sludge piles on the tank bottom and superheats it with every heating cycle, stressing the steel and the glass lining, while the anode rod — the tank's sacrificial bodyguard — dissolves years ahead of schedule in hard water. Once the anode is gone, the tank corrodes from the inside out. In Red Oak, most breached tanks we replace tell exactly this story: deep sediment, a consumed anode, and a pinhole at the weakest point.
Red Oak rides the I-35E growth corridor between DeSoto and Waxahachie: 1990s subdivisions maturing into their second water heater generation, plus 2000s and 2010s rooftops still on their first. The 1990s-era homes are the current hotspot — original or early-replacement heaters now 15 to 25 years old, failing at valves, elements, and tank seams. That age profile is the leak-risk profile. Many Red Oak tanks are second- or third-generation units installed in the 1990s and 2000s — now themselves 15 to 25 years old — with anode rods that were never inspected, let alone replaced. Original-era supply lines add their own contribution, shedding scale and corrosion into every downstream tank. And installations from earlier decades often predate modern code items: no expansion tank on a closed system, T&P discharge routed nowhere useful, no drain pan under an attic unit. Every leak call here is also a code-compliance survey, because what's missing often caused what's leaking.
Garage installs are standard; two-story plans often use the attic. Builder-grade original installs sometimes lack expansion tanks — worth correcting during service. Placement decides how much a leak costs you, not just how it's fixed. A garage leak ruins an afternoon; an attic leak over living space ruins ceilings, insulation, flooring, and the week. Red Oak homes with attic heaters and no drain pan — or a pan with no drain line — are the highest-stakes leak calls we run, and the first thing we correct, even when the immediate repair is a simple valve. Garage installs get leak detectors in the pan as cheap insurance; attic installs get them as essential equipment.
In Red Oak, the call usually starts the same way. A 1997 subdivision home on its original water heater — twenty-nine years old and running on borrowed time — a damp spot, a drip, a water bill that crept up for two months before anyone looked behind the heater. The dry-and-watch test found the source in twenty minutes; the fix took one visit. Most tank-leak stories here end the way they start: with water going where it shouldn't, and a single service call putting it right.
How a Tank Leak Announces Itself
Water tells the truth if you know how to read it. Here's what each symptom points to:
- Puddle or standing water at the heater's base: The most alarming and most common report. A puddle can mean a failed tank — or it can mean a weeping drain valve, a T&P discharge, or condensation runoff. The key test: dry the area completely, lay down paper towels, and check back in an hour. Water reappearing with no fitting above it is the bad news; water tracing to a valve or connection is the repairable news.
- T&P relief valve dripping or discharging: Water coming from the pipe running down the side of the tank means the temperature-and-pressure relief valve is doing its job — or failing at it. Causes range from a worn-out valve to excessive household water pressure to a failed expansion tank on a closed plumbing system. A constantly dripping T&P deserves prompt attention: it's either protecting you from overpressure or crying wolf, and both need a technician.
- Drain valve weeping or dripping: The little spigot at the tank bottom is a notorious leak point — especially the plastic valves installed on builder-grade heaters, which crack with age and heat. Often the valve starts weeping after someone (a homeowner, a previous tech) operates it for the first time in years. Replacement with a brass ball valve is a quick, permanent fix when the tank is otherwise sound.
- Rust streaks or corrosion at fittings: Rust-colored streaks running down from the top nipples, the T&P port, or the drain valve area tell you water has been escaping slowly — possibly for months. Surface corrosion on fittings is repairable; rust blooming from the tank shell itself, especially along the side seam or bottom edge, signals the tank is failing structurally.
- Moisture at the top inlet/outlet connections: The hot and cold connections at the tank top live a hard life: dissimilar metals, constant temperature cycling, and in hard-water areas, mineral-laden seepage that corrodes dielectric unions. Weeping here is usually a repairable nipple or flex-line replacement — but chronic seepage that has rusted the tank top itself can condemn the unit.
- Warm or damp spots on the tank jacket: A tank that feels warm or damp in one spot — particularly low on the shell — may be weeping through a pinhole under the insulation where you can't see it. By the time moisture shows on the jacket, the corrosion underneath is usually advanced. This symptom leans heavily toward replacement.
- Unexplained jump in the water bill: A slow leak that evaporates or drains where you don't look — into a floor drain, down a T&P line routed outside — can run for weeks before anyone sees water. If your usage spikes with no lifestyle change, check the heater area with dry paper towels and look at the discharge pipe terminations outside.
Keeping Your Tank From Leaking Again
Most tank leaks are preventable, or at least postponable. Flush the tank yearly to keep sediment from superheating the bottom and stressing the shell. Replace the anode rod every 3 to 5 years in hard water — it's the tank's bodyguard, and when it's gone, the tank is next. Check the expansion tank's air pressure annually; a waterlogged expansion tank lets pressure spikes hammer the T&P valve and every joint in the system.
Put a battery-powered leak detector in the drain pan — a $25 device that screams when water appears where it shouldn't, buying you hours or days of early warning. Know where your heater's cold-water shutoff is before you need it. And if your heater is over 10 years old, start planning: proactive replacement on your schedule beats emergency replacement on the leak's schedule, every time.
Red Oak homeowners — get your tank fixed right. Get Help Now →
The Honest Cost Breakdown
It depends entirely on what's leaking — which is why diagnosis comes before numbers. Component repairs (T&P valve, drain valve, top fittings, supply lines) typically run $150 to $450 in the DeSoto area, parts and labor. Full tank replacement, when the shell has failed, generally lands between $1,200 and $2,400 for a standard residential gas or electric tank, including code-required items like the expansion tank and drain pan — treat both ranges as planning figures.
What moves the number: attic versus garage placement (attic replacements take longer and need more protection for the home), accessibility, whether the existing installation meets current code (many older installs need an expansion tank, proper T&P routing, or a pan added), and gas versus electric. We'll always give you the repair number and the replacement number side by side when both are options — the math should be yours to see.
What Red Oak Homeowners Ask Us
Can a leaking water heater tank be patched or sealed?
No — not safely, not legally, not durably. A tank is a pressurized steel vessel, and once corrosion breaches the shell, no epoxy, sealant, or patch restores its pressure rating. Anything applied to the outside hides the leak while corrosion continues inside. The only safe fix for a breached tank is replacement. Leaks from valves and fittings, though, are genuinely repairable — which is why accurate diagnosis matters so much.
My T&P valve keeps dripping — do I just need a new valve?
Sometimes — T&P valves do wear out. But a new valve that keeps dripping is telling you the real problem is pressure: a failed expansion tank, excessive municipal pressure, or thermal expansion on a closed system. We test household pressure and the expansion tank before replacing the valve, so you're not buying the same repair twice.
How do I tell a leak from the top versus the bottom of the tank?
Top leaks — at the inlet/outlet nipples, T&P port, or supply lines — are usually repairable component failures. Bottom leaks with no fitting above them to blame almost always mean the tank shell has corroded through, which means replacement. The dry-and-watch test (paper towels around every suspect point) distinguishes them reliably, and it's the first thing we do on every leak call.
How fast do I need to act on a water heater leak?
Active leaking: today. Shut the water off at the heater's inlet valve (or the house main), kill power or gas to the unit, and call for same-day service — every hour of active leaking is more water in your floors, walls, or ceilings. A slow weep from a fitting can wait for a scheduled visit, but don't let it wait weeks: slow leaks corrode everything they touch and have a habit of becoming fast leaks.
How does Red Oak's water affect tank leaks?
Municipal water of moderate hardness. Standard North Texas sediment story: a decade or more of mineral accumulation in tanks that were never flushed, insulating lower elements and burying gas valve probes. Sediment piles up and superheats the tank bottom, the anode rod dissolves years early, and once the anode is gone the steel tank starts corroding from the inside — the direct road to a breached shell. Annual flushing and anode replacement on schedule are the two highest-value habits here.
My Red Oak home was built in the 1990s to 2020s — what does that mean for leak risk?
Red Oak rides the I-35E growth corridor between DeSoto and Waxahachie: 1990s subdivisions maturing into their second water heater generation, plus 2000s and 2010s rooftops still on their first. The 1990s-era homes are the current hotspot — original or early-replacement heaters now 15 to 25 years old, failing at valves, elements, and tank seams. Older tanks, original-era supply lines, and installations that predate modern code items (expansion tanks, proper drain pans) all raise leak risk — and make the diagnostic visit more valuable, since what we find determines whether a component repair or full replacement is the honest answer.
Water Heater Leak Repair Specialists serves Red Oak, TX 75154 with same-day tank water heater leak repair. Call (833) 713-2101 →